快速了解
使用
configureStore(配置存储)创建 Redux storeconfigureStore接受reducer函数作为命名参数configureStore使用默认设置自动设置 storeimport { configureStore } from '@reduxjs/toolkit'; import counterReducer from '../features/counter/counterSlice'; export const store = configureStore({ reducer: { counter: counterReducer, }, });
为 React 应用程序组件提供 Redux store
使用 React-Redux
<Provider>组件包裹你的<App />传递 Redux store 如
<Provider store={store}>import React from 'react'; import { createRoot } from 'react-dom/client'; import { Provider } from 'react-redux'; import { store } from './app/store'; import App from './App'; import './index.css'; const container = document.getElementById('root'); const root = createRoot(container); root.render( <React.StrictMode> <Provider store={store}> <App /> </Provider> </React.StrictMode> );
使用
createSlice创建 Redux “slice” reducer使用字符串名称、初始状态和命名的 reducer 函数调用“createSlice”
Reducer 函数可以使用 Immer 来“改变”状态
导出生成的 slice reducer 和 action creators
import { createSlice } from "@reduxjs/toolkit";

export const counterSlice = createSlice({
  name: "counter",
  initialState: {
    value: 0,
  },
  reducers: {
    increment: (state) => {
      state.value += 1;
    },
    decrement: (state) => {
      state.value -= 1;
    },
    incrementByAmount: (state, action) => {
      state.value += action.payload;
    },
  },
});
export const { increment, decrement, incrementByAmount }=counterSlice.actions;
export default counterSlice.reducer;
在 React 组件中使用 React-Redux
useSelector/useDispatch钩子使用
useSelector钩子从 store 中读取数据使用
useDispatch钩子获取dispatch函数,并根据需要 dispatch actionsimport React from 'react'; import { useSelector, useDispatch } from 'react-redux'; import { decrement, increment } from './counterSlice'; export function Counter() { const count = useSelector(state => state.counter.value) const dispatch = useDispatch() return ( <div> <div> <button aria-label="Increment value" onClick={() => dispatch(increment())} > Increment </button> <span>{count}</span> <button aria-label="Decrement value" onClick={() => dispatch(decrement())} > Decrement </button> </div> </div> ) }
术语
Action
action 是一个具有 type 字段的普通 JavaScript 对象。你可以将 action 视为描述应用程序中发生了什么的事件.
type 字符串是一个描述action 的名字,比如"todos/todoAdded"。我们通常把那个类型的字符串写成“域/事件名称”,其中第一部分是这个 action 所属的特征或类别,第二部分是发生的具体事情。
action 对象可以有其他字段,其中包含有关发生的事情的附加信息,该信息放在名为 payload 的字段中。
const addTodoAction = {
  type: 'todos/todoAdded',
  payload: 'Buy milk'
}
Action Creator
action creator 是一个创建并返回一个 action 对象的函数。它的作用是让你不必每次都手动编写 action 对象:
const addTodo = text => {
  return {
    type: 'todos/todoAdded',
    payload: text
  }
}
Reducer
reducer 是一个函数,接收当前的 state 和一个 action 对象,必要时决定如何更新状态,并返回新状态。函数签名是:(state, action) => newState。 你可以将 reducer 视为一个事件监听器,它根据接收到的 action(事件)类型处理事件。
说明
“Reducer” 函数的名字来源是因为它和 Array.reduce() 函数使用的回调函数很类似。
Reducer 必需符合以下规则:
- 仅使用
state和action参数计算新的状态值 - 禁止直接修改
state。必须通过复制现有的state并对复制的值进行更改的方式来做 不可变更新(immutable updates)。 - 禁止任何异步逻辑、依赖随机值或导致其他“副作用”的代码
稍后我们将更多地讨论 reducer 的规则,包括为什么它们很重要以及如何正确地遵循它们。
reducer 函数内部的逻辑通常遵循以下步骤:
- 检查 reducer 是否关心这个 action
- 如果是,则复制 state,使用新值更新 state 副本,然后返回新 state
- 否则,返回原来的 state 不变
下面是 reducer 的小例子,展示了每个 reducer 应该遵循的步骤:
const initialState = { value: 0 }

function counterReducer(state = initialState, action) {
  // 检查 reducer 是否关心这个 action
  if (action.type === 'counter/increment') {
    // 如果是,复制 `state`
    return {
      ...state,
      // 使用新值更新 state 副本
      value: state.value + 1
    }
  }
  // 返回原来的 state 不变
  return state
}
当前 Redux 应用的 state 存在于一个名为 store 的对象中。
store 是通过传入一个 reducer 来创建的,并且有一个名为 getState 的方法,它返回当前状态值:
import { configureStore } from '@reduxjs/toolkit'

const store = configureStore({ reducer: counterReducer })

console.log(store.getState())
// {value: 0}
Dispatch
Redux store 有一个方法叫 dispatch。更新 state 的唯一方法是调用 store.dispatch() 并传入一个 action 对象。 store 将执行所有 reducer 函数并计算出更新后的 state,调用 getState() 可以获取新 state。
store.dispatch({ type: 'counter/increment' })

console.log(store.getState())
// {value: 1}
**dispatch 一个 action 可以形象的理解为 “触发一个事件”**。发生了一些事情,我们希望 store 知道这件事。 Reducer 就像事件监听器一样,当它们收到关注的 action 后,它就会更新 state 作为响应。
我们通常调用 action creator 来调用 action:
const increment = () => {
  return {
    type: 'counter/increment'
  }
}

store.dispatch(increment())

console.log(store.getState())
// {value: 2}
Selector
Selector 函数可以从 store 状态树中提取指定的片段。随着应用变得越来越大,会遇到应用程序的不同部分需要读取相同的数据,selector 可以避免重复这样的读取逻辑:
const selectCounterValue = state => state.value

const currentValue = selectCounterValue(store.getState())
console.log(currentValue)
// 2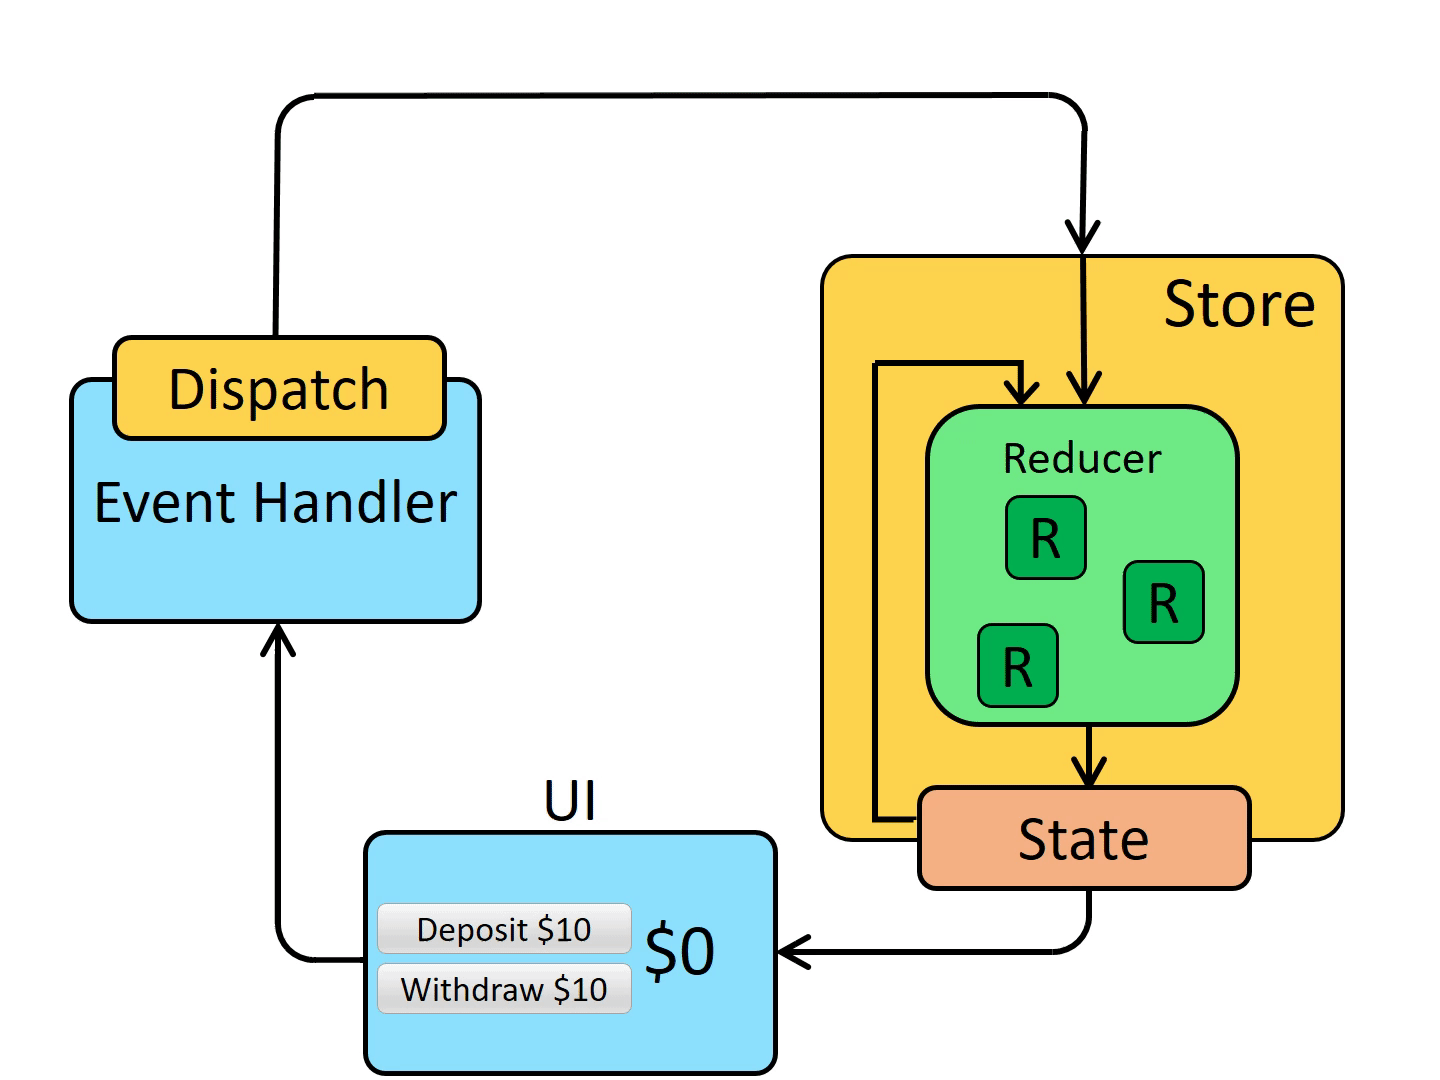
基本使用
单词
- mutate :vi.变化,产生突变;vt.改变,使突变。 美ˈmjuːteɪt
- mutation :n.(动物或植物的)突变,变异;(基因结构突变产生的)突变体,突变型。 美mjuːˈteɪʃ(ə)n
- immutability : n.不变;永恒性;不变性 美ɪˌmjuːtəˈbɪləti
- thunk : n.形实转换程序 美θʌŋk
创建 store
import { configureStore } from "@reduxjs/toolkit";
// 导入reducer函数
import counterReducer from "../features/counter/counterSlice";
// 配置状态仓库
export const store = configureStore({
  reducer: {
    counter: counterReducer,
  },
});
configureStore要求我们传入reducer函数。
我们传入对象中不同的reducer,对象的键名key将定义为状态树中的键名key。
// counterReducer
import { createSlice } from "@reduxjs/toolkit";
export const counterSlice = createSlice({
  name: "counter",
  initialState: {
    value: 0,
  },
  reducers: {
    increment: (state) => {
      // Redux Toolkit 允许我们在 reducers 写 "可变" 逻辑。
      // 并不是真正的改变 state 因为它使用了 immer 库
      // 当 immer 检测到 "draft state" 改变时,会基于这些改变去创建一个新的
      // 不可变的 state
      state.value += 1;
    },
    decrement: (state) => {
      state.value -= 1;
    },
    incrementByAmount: (state, action) => {
      state.value += action.payload;
    },
  },
});

export const { increment, decrement, incrementByAmount } = counterSlice.actions;
export default counterSlice.reducer;
// 具体参见Counter组件
export const selectCount = state => state.counter.value
之前我们在点击按钮的时候会dispatch三种不同的action
- {type: “counter/increment”}
- {type: “counter/decrement”}
- {type: “counter/incrementByAmount”}
action是带有type字段的普通对象,我们通常由action creator函数来创建和返回action对象。
createSlice 的函数,它负责生成 action 类型字符串、action creator 函数和 action 对象的工作。
注意看传入createSlice对象参数的name值,用做action类型的第一部分;reducers对象的每个键名用作action类型的第二部分。
所以”counter” 名称 + “increment” reducer 函数生成了一个 action 类型 {type: “counter/increment”}。
createSlice还需要我们传入一个初始状态值initialState,以便第一次调用就有一个state。
createSlice 会自动生成与我们编写的 reducer 函数同名的 action creator。
 console.log(counterSlice.actions.increment())
// {type: "counter/increment"}
它还知道如何响应这些action类型的slice reducer函数:
const newState = counterSlice.reducer(
  { value: 10 },
  counterSlice.actions.increment()
)
console.log(newState)
// {value: 11}
Reducer规则
- 仅使用 state 和 action 参数计算新的状态值
- 禁止直接修改 state。必须通过复制现有的 state 并对复制的值进行更改的方式来做 不可变更新(immutable updates)。
- 禁止任何异步逻辑、依赖随机值或导致其他“副作用”的代码
规则原因: - 使你的代码可预测。当函数的输出仅根据输入参数计算时,更容易理解该代码的工作原理并对其进行测试。
- 如果一个函数依赖自身外的变量或者行为随机,你判断不了运行它时会发生什么。
- 如果一个函数mutate了其他对象,比如它的参数,这可能会意外的改变它的工作方式。
- Redux DevTools 的一些功能取决于你的 reducer 是否正确遵循这些规则。
Reducer 与 Immutable 更新
在 Redux 中,永远 不允许在 reducer 中更改 state 的原始对象!
// ❌ 非法 - 默认情况下,这将更改 state!
state.value = 123
那如何更新状态呢,使用拓展运算符
{
  ...state,
  value:"说"
}
createSlice 内部使用了一个名为 Immer 的库,可以让你以更简单的方式编写不可变更新!参见该标题下面的代码。
用thunk编写异步逻辑
thunk 是一种特定类型的 Redux 函数,可以包含异步逻辑。Thunk 是使用两个函数编写的:
- 一个内部 thunk 函数,它以 dispatch 和 getState 作为参数
- 外部创建者函数,它创建并返回 thunk 函数
// 下面这个函数就是一个 thunk ,它使我们可以执行异步逻辑
// 你可以 dispatched 异步 action `dispatch(incrementAsync(10))` 就像一个常规的 action
// 调用 thunk 时接受 `dispatch` 函数作为第一个参数
// 当异步代码执行完毕时,可以 dispatched actions
export const incrementAsync = amount => dispatch => {
  setTimeout(() => {
    dispatch(incrementByAmount(amount))
  }, 1000)
}
如何调用
store.dispatch(incrementAsync(5))使用thunk需要将redux-thunk添加到redux。这一步Redux Toolkit已经配置好了。
例:
// 外部的 thunk creator 函数
const fetchUserById = userId => {
  // 内部的 thunk 函数
  return async (dispatch, getState) => {
    try {
      // thunk 内发起异步数据请求
      const user = await userAPI.fetchById(userId)
      // 但数据响应完成后 dispatch 一个 action
      dispatch(userLoaded(user))
    } catch (err) {
      // 如果过程出错,在这里处理
    }
  }
}
React Counter 组件
import React, { useState } from 'react'
import { useSelector, useDispatch } from 'react-redux'
import {
  decrement,
  increment,
  incrementByAmount,
  incrementAsync,
  selectCount
} from './counterSlice'
import styles from './Counter.module.css'

export function Counter() {
  const count = useSelector(selectCount)
  const dispatch = useDispatch()
  const [incrementAmount, setIncrementAmount] = useState('2')

  return (
    <div>
      <div className={styles.row}>
        <button
          className={styles.button}
          aria-label="Increment value"
          onClick={() => dispatch(increment())}
        >
          +
        </button>
        <span className={styles.value}>{count}</span>
        <button
          className={styles.button}
          aria-label="Decrement value"
          onClick={() => dispatch(decrement())}
        >
          -
        </button>
      </div>
      {/* 这里省略了额外的 render 代码 */}
    </div>
  )
}
使用 useSelector 提取数据
首先,useSelector 这个 hooks 让我们的组件从 Redux 的 store 状态树中提取它需要的任何数据。如例:
useSelector((state) => state.counter.value)selector函数
export const selectCount = state => state.counter.value可以访问Redux的store时我们可以这样使用
const count = selectCount(store.getState())
console.log(count)
// 0
组件不能直接访问store,我们将采用useSelector进行状态提取。
const count = useSelector(selectCount)每当一个 action 被 dispatch 并且 Redux store 被更新时,
useSelector将重新运行我们的选择器函数。如果选择器返回的值与上次不同,useSelector将确保我们的组件使用新值重新渲染。
使用 useDispatch 来 dispatch action
如果我们在当下环境可以访问store
store.dispatch(increment())否则
const dispatch = useDispatch()<button
className={styles.button}
aria-label="Increment value"
onClick={() => dispatch(increment())}
>
+
</button>状态划分规则
整个应用程序所需的全局状态应该放在 Redux store 中。而只在一个地方用到的状态应该放到组件的 state。
Redux与项目衔接
import React from 'react'
import ReactDOM from 'react-dom'
import './index.css'
import App from './App'
import store from './app/store'
import { Provider } from 'react-redux'
import * as serviceWorker from './serviceWorker'

ReactDOM.render(
  <Provider store={store}>
    <App />
  </Provider>,
  document.getElementById('root')
)
扯闲篇
单词
prepare 美prɪˈper v.使做好准备,把……预备好;(为……)做好准备;预备(饭菜),做(饭);
自己不常用但是很实用
排序
const posts=[{date:10},{date:30}{date:20}{date:100},{date:6}{date:1},{date:2}];
const orderedPosts = posts.slice().sort((a, b) => b.date.localeCompare(a.date))
Boolean、every
Boolean:如果省略该参数或参数值为 0、-0、null、false、NaN、undefined,或空字符串(""),则该对象具有的初始值为 false。所有其它值,包括任何对象,空数组([])或字符串 "false",都会创建一个初始值为 true 的对象。
let name="";
// 可用于判断是否为空
const canSave=Boolean(name)
every() :测试一个数组内的所有元素是否都能通过某个指定函数的测试。它返回一个布尔值。
const canSave =[title, content, userId].every(Boolean)对象式Reducer写法
recuders字段内我们可以定义一个类似于 {reducer, prepare} 的对象:
const postsSlice = createSlice({
  name: 'posts',
  initialState,
  reducers: {
    postAdded: {
      reducer(state, action) {
        // action.payload 参数含有title、content
        state.push(action.payload)
      },
      // 注意这里的参数传递
      prepare(title, content) {
        return {
          payload: {
            id: nanoid(),
            title,
            content
          }
        }
      }
    }
    // other reducers here
  }
})
prepare 函数用于向action添加额外描述性的值返回一个包含 payload 字段的对象。
异步请求篇
异步数据与数据请求
Thunk 函数
在Redux Toolkit环境中,它允许你将thunk函数直接传递给store.dispatch。调用thunk函数总是将(dispatch, getState)作为它的参数。所以Thunks函数内可以使用 action creator再次dispatch普通的action。看以下示例:
const store = configureStore({ reducer: counterReducer })

const exampleThunkFunction = (dispatch, getState) => {
  const stateBefore = getState()
  console.log(`Counter before: ${stateBefore.counter}`)
  dispatch(increment())
  const stateAfter = getState()
  console.log(`Counter after: ${stateAfter.counter}`)
}

store.dispatch(exampleThunkFunction)
为了与 dispatch 普通 action 对象保持一致,我们将特们取名为thunk action creators,他返回thunk函数
const laodAdd=(amount)=>{
   return (dispatch,getState)=>{
       // 修改前的值获取
       const stateBefore=getState();
       dispatch(incrementByAmount(amount));
       // 获取修改后的值
       const stateAfter = getState();
   }
}
编写异步 Thunks-createAsyncThunk
案例1
import { createSlice, nanoid, createAsyncThunk } from '@reduxjs/toolkit'
import { client } from '../../api/client'

const initialState = {
  posts: [],
  status: 'idle',
  error: null
}

export const fetchPosts = createAsyncThunk('posts/fetchPosts', async () => {
  // 异步请求数据
  const response = await client.get('/fakeApi/posts')
  return response.data
})

export const addNewPost = createAsyncThunk(
  'posts/addNewPost',
  // payload 创建者接收部分“{title, content, user}”对象
  async initialPost => {
    // 我们发送初始数据到 API server
    const response = await client.post('/fakeApi/posts', initialPost)
    // 响应包括完整的帖子对象,包括唯一 ID
    return response.data
  }
)

const postsSlice = createSlice({
  name: 'posts',
  initialState,
  reducers: {
    // omit existing reducers here
  },
  extraReducers(builder) {
    builder
      // 当请求开始时,我们将 status 枚举设置为 'loading'
      .addCase(fetchPosts.pending, (state, action) => {
        state.status = 'loading'
      })
      //如果请求成功,我们将 status 标记为 'succeeded',并将获取的帖子添加到 state.posts
      .addCase(fetchPosts.fulfilled, (state, action) => {
        state.status = 'succeeded'
        // Add any fetched posts to the array
        state.posts = state.posts.concat(action.payload)
      })
      // 处理请求失败的情况
      .addCase(fetchPosts.rejected, (state, action) => {
        state.status = 'failed'
        state.error = action.error.message
      })
      .addCase(addNewPost.fulfilled, (state, action) => {
      // 我们可以直接将新的帖子对象添加到我们的帖子数组中
        state.posts.push(action.payload)
      })
  }
})
createAsyncThunk两个参数
将用作生成的 action 类型的前缀的字符串(命名规则就是:slice名字/函数名字)
一个 “payload creator” 回调函数,它应该返回一个包含一些数据的
Promise,或者一个被拒绝的带有错误的Promise
extraReducers 字段
extraReducers 选项是一个接收名为 builder 的参数的函数。builder 对象提供了一些方法,让我们可以定义额外的 case reducer,这些 reducer 将响应在 slice 之外定义的 action。我们将使用 builder.addCase(actionCreator, reducer) 来处理异步 thunk dispatch 的每个 action。
extraReducers对象式写法
import { createSlice, createAsyncThunk } from '@reduxjs/toolkit'

import { client } from '../../api/client'

export const fetchNotifications = createAsyncThunk(
  'notifications/fetchNotifications',
  async (_, { getState }) => {
    const allNotifications = selectAllNotifications(getState())
    const [latestNotification] = allNotifications
    const latestTimestamp = latestNotification ? latestNotification.date : ''
    const response = await client.get(
      `/fakeApi/notifications?since=${latestTimestamp}`
    )
    return response.data
  }
)

const notificationsSlice = createSlice({
  name: 'notifications',
  initialState: [],
  reducers: {},
  // 注意这里的写法较之上个案例的异同
  extraReducers: {
    [fetchNotifications.fulfilled]: (state, action) => {
      state.push(...action.payload)
      // 以最新的优先排序
      state.sort((a, b) => b.date.localeCompare(a.date))
    }
  }
})

export default notificationsSlice.reducer

export const selectAllNotifications = state => state.notifications
性能与数据范式化篇
…待更新